

How to take a child's photo for passport and ID card?
For some the end of vacation, for others the beginning or time to plan future trips. If you are planning a trip abroad with a child, do not forget the necessary documents! A child on a trip needs an ID or passport . Today we will describe to you how to take a photo at home.
When going abroad, your child needs an identity document. I remember when a dozen or so (or rather a few dozen!) years ago, my data was entered in my mother's passport and nothing more was needed for happiness. The whole family traveled on parents' passports and it was enough to leave our country.
Times have changed. Nowadays, in order to be allowed on board a plane, a child must identify himself with his own document with a photo. Theoretically, by land, you also can't cross the state border without such a document. So what to make first: proof or passport? Is it possible to take a picture at home?
What for the child: proof or passport?
If you are traveling within the European Union or Schengen zone, an ID card is sufficient. In addition, making an ID card is a bit simpler, cheaper and faster than a passport – the application can be submitted online, while with a passport you have to appear at the window and both parents must do it.
This also means (in the case of the ID card) that you don't have to print a photo at all (when applying online)! And most importantly, the proof for the child is free!
However, if you want to travel with your child outside the EU then a passport is necessary. From experience, we'll hint that it's better to make a passport right away, because you never know when some promotional opportunity will hit 😉
Both an ID card and a passport for a child are issued for 5 years.
It's also worth mentioning that if you're traveling within the EU/EFTA, in addition to proof for your child, an EHIC (European Health Insurance Card) card will also come in handy – this is confirmation of the right to receive health services abroad at the expense of the National Health Service.
Importantly, the photo you take for the passport is also valid for the proof.
How to take a photo of a child for a passport?
There are two ways: either in a photo studio or you can also do it yourself at home.
The first is easy, so here we will focus on the second option, which is also the one we opted for. Especially since the requirements for a child's photo are far less stringent than for adult photos (especially for children under 5).
Why we decided to take the photo ourselves? It wasn't about saving money (although partly, too), but saving time and stress for the child. When we took photos for the first document, Olive didn't even hold her head straight as she lay down. Probably an experienced photographer would have managed, but we knew that the road + new people + sounds and above all the lights may not be favorable conditions for a newborn baby. Aside from the queues, a lot of people, etc.
So we concluded that we will do it ourselves at home, as soon as the girl is sleepy, fed and willing to "get acquainted" 😉
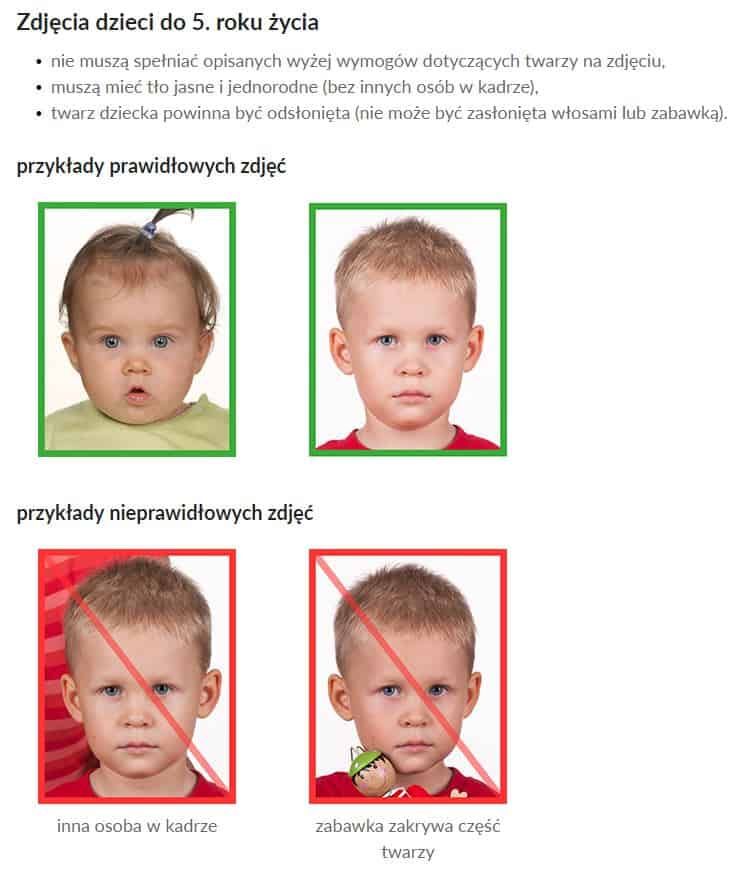
This is the official guidelines for photos for children under 5 years old:
What is needed to take a photo for a passport?
- child,
- camera/phone,
- light background
- and computer.
NOTHING MORE. Well, maybe a little patience 😉
- The baby can be laid or sat on a bright background – it doesn't have to be a snow-white sheet like in the Vizira commercial. We did on a light beige blanket. Let go of putting on beautiful clothes, because you won't see it anyway. In our case it was simply a light-colored onesie.
- It is best to take the photo during the day, in daylight, also when the baby is rested and cooperative.
- Take a picture of the baby's face so that it takes up most of the photo. He should look straight ahead, but if he turns his head a little, nothing will happen too. Important: there should be nothing else in the photo and nothing should cover the child's face.
- Repeat point No. 3 of 50 times. On average, some printable one comes out in 45-46 times 😉
- After taking the photos, just choose the one that came out best and crop it accordingly – the size of one photo should be 35mm x 45mm (some online generators will do it for you, but it's better to have everything ready).
- Then, using one of the many templates available on the Internet, we prepare a 10×15 photo, on which 8 photos will fit (unless you are applying for an online proof, then you can skip this and the next steps).
- Prepared photo we print in some vending machine or send to print via the Internet.
- We leave two photos for the document and distribute the rest around the family and put them in the wallet 😛
In our book you will find as many as 132 pages full of inspiration, descriptions, our reviews and practical information.
Summary
As you can see, taking a photo for your ID and/or passport is not so difficult 😉 In the process, you will save yourself and the beaver from stress, and you can also have a great laugh about it.
At first we were afraid to take pictures at home, but as long as there are no particularly strict requirements you can try, and thus you can save yourself time and money.